QVidium Video Transport Software
The Proxy software runs on the following.
Minimum Intel-based Windows PC requirements
- Windows 10 (64-bit) with QVidium's Cygwin Image
- Intel Linux distributions such as Ubuntu, Redhat and CentOS 6.
- ARM Linux distributions such as Ubuntu and CentOS 6.
- NOTE: If there is a choice in OS, we recommend using Linux to maximize robustness
- 8 Gbyte RAM
- 2 GHz or higher Intel CPU
- 1 Gigabit Ethernet
Windows Install (or Update)
Cygwin Install (One Time Install)
- Click on WindowsProxy.zip and save it to your Desktop or Downloads Folder
- Right-click on the WindowsProxy.zip file. This should popup a menu.
- Select an option like Extract files... or something similar. This should open an application or a Windows dialog.
- Extract the files to the C:\ folder.
Windows Proxy Install (or Update)
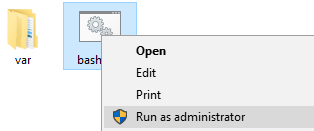
- Open the Proxy folder and right-click on the bash.bat file.

- Select Run as administrator from the popup menu.
- Enter the following command on the terminal.
curl -k https://www.qvidium.tv/proxy/WindowsQVidiumProxy-69a1.run > install.sh
sh install.sh
- Go to Proxy Setup section below to finish setup.
Linux Install (or Update)
Recent versions of Ubuntu may have biosdevname installed.
If so, then you must un-install biosdevname so that the primary
Ethernet device name is /dev/eth0.
- From your Linux web browsr click on QVidiumProxy-90.run and save it to your system.
- Enter the following command on the terminal.
sh ~/Downloads/QVidiumProxy-90.run
If you saved the file somewhere other than your Downloads directory, you need to enter that directory. For example if you saved the file in the /tmp directory, you would enter.sh /tmp/QVidiumProxy-90.run
NOTE: If you have version 66 or older, you use these same instructions.
To update to future versions of the Proxy software you can enter the following from the terminal/usr/local/bin/QVidium update
- Go to Proxy Setup section below to finish setup.
-
NOTE: If you are setting up a new Ubuntu server, consider installing the following:
- Enter http://192.168.1.90:8111 in your Web Browser
where you replace 192.168.1.90 with your PC's IP Address.
- Click on the Tx Proxy 1 - > Register link to install a Tx License
- Click on the Rx Proxy 1 - > Register link to install a Rx License
- Go to http://qvidium.com/proxy/QVARQLinuxManual-v4.pdf for information about the proxy software.
- Go to http://qvidium.com/proxy/AWS-Proxy_Setup.pdf for help in setting up an Amazon Web Services (AWS) Cloud-based Proxy Server.
sudo apt update
sudo apt install net-toole
sudo apt install traceroute
sudo apt install openssh-server  # Optional, to enable remote shell access
sudo reboot